Despite the massive improvements in Windows-to-mac connectivity, printing from a Mac to a printer attached to a PC seems to be more art than science. After many attempts I finally managed to track down some instructions on how to print from Leopard (and Snow Leopard) to Windows Vista that actually work. Other (more simple) ways might work for you; this is the only way I could get printing to work for me.
The original article can be found at here
Step 1: Share the printer in Windows Vista
If you don’t know how to do this you are reading the wrong blog post.
Step 2: Edit the Windows Registry (and maybe Group Policy)
Use the Registry Editor to set the following registry entry (create the key if it doesn’t exist):
- Path: HKEY_LOCAL_MACHINE/SYSTEM/CurrentControlSet/Control/Lsa
- Key: lmcompatibilitylevel (this is a DWORD)
- Value: 1
If you are running Vista Business, Ultimate, and Enterprise you will also need to set a Group Policy. Open the Group Policy Editor (gpedit.msc) and set:
- Computer Configuration/Windows Settings/Security Settings/Local Policies/Security Options
- Right-click the ‘Network security: LAN Manager authentication level’ policy item, and select ‘Properties’ from the pop-up menu.
- Select the ‘Local Security Settings’ tab.
- Select ‘Send LM & NTLM – user NTLMv2 session security if negotiated’ from the dropdown menu.
Step 3: Add the Shared Printer to Your Mac
This is far more difficult than it should be. You would think you would open the Print & Fax dialog, select ‘+’, select Windows, find your printer in the browse window and select it. No chance. Instead you need to:
- Choose the ‘Print & Fax’ icon in the System Preferences window and Click the plus (+) sign, located just below the list of installed printers.
- Right-click the printer browser window’s toolbar, select ‘Customize Toolbar’, drag the ‘Advanced’ icon from the icon palette to the printer browser window’s toolbar; click ‘Done’.
- Click the ‘Advanced’ icon in the toolbar; select ‘Windows’ from the Type dropdown menu.
- The next step is to enter the shared printer’s device URL, in the following format:
smb://user:password@workgroup/ComputerName/PrinterName
An example would look like this: smb://TomNelson:MyPassword@CoyoteMoon/scaryvista/HPLaserJet5000
The PrinterName is the ‘Share name’ you entered in Vista.
- Enter the shared printer’s URL in the ‘Device URL’ field.
- Select ‘Generic Postscript Printer’ from the Print Using dropdown menu. You can try using one of the specific printer drivers from the list. The drivers most likely to work are labeled ‘Gimp Print’ or ‘PostScript.’ These drivers usually include the proper protocol support for shared network printing.
7. Click the ‘Add’ button.
All done.
Good luck. It worked for me, but I can’t promise anything.
 I’ve been struggling for the last 18 months trying to get Time Machine to work with disks attached to my Airport Extreme Base Station (AEBS). Things would work once or twice then stop. Disks would disappear and reappear. Arrg! At this point I should say that external disks on AEBS are not officially supported as targets for Time Machine, so the fact that it doesn’t work is not surprising but very frustrating.
 The Apple Time Capsule is supported, but as I have a 4TB Drobo disk array and a new dual-band AEBS I don’t see the point of going out and spending $299 and up for yet another device. Despite many attempts at different fixes nothing would work. Ultimately I gave up.
Then a couple of days ago whilst troubleshooting another problem I came across a post in a forum that suggested enabling an option called ‘Use Interference Robustness’. On the AEBS, choose “manual setup, the Airport pane, Wireless tab, ‘Wireless Options’.

This innocuous little check box seems to have worked miracles. Since I turned the option on I haven’t noticed any speed degradation on the network, and Time Machine has been working flawlessly! I’m now three days into the new setup and monitoring it closely. The big test is going to be a restore (backups are useless if they won’t restore). Keep watching this space for an update.
 Yesterday I managed to grab a couple of hours and headed up to San Francisco to meet the team at Xobni. Xobni (Inbox spelt backwards) is an add in for Microsoft Outlook and (according to the company web site) is “revolutionizing the way people manage email relationships.” Having used the software for nearly a year I have to agree.
I’ve been a user of Xobni since September of 2008 (version 1.4.3) when the software was – how shall we put it? – less than fully functional. The current version (1.8) is stable and feature rich, and has transformed my Outlook use.
 At this point I have a confession to make. I’m a bit of a pack rat when it comes to Outlook. My general motto is “why delete it when you can file it?” This behaviour has led to a slight bloating of my PST files. When I say ‘slight’ I mean that I now have 11 PST files totalling 11.8GB containing 3,400 folders and 92,000 messages. You might think that finding messages had become somewhat of a problem; you’d be right.
Xobni installs into Outlook (2003 or 2007) and adds a new pane to the Outlook window. It indexes (in the background or at your command) all your messages and presents them instantly based on suggestions it makes or on searches you enter. It also connects to LinkedIn and Facebook to pull pictures and contact details for people you exchange emails with.

Tyler Newman
Over the last year I’ve moved from slight interest, to avid user, to beta tester to alpha tester. During that time I’ve seen the product mature rapidly, and an email relationship has blossomed with Tyler Newman. Tyler looks after QA at Xobni and is the mainstay behind the support forum. Because my usage profile is somewhat towards the outer end of the bell curve I’ve managed to push the software into areas that most people don’t and so have uncovered a few rogue bugs along the way. Tyler’s done a great job solving the problems and working back through the development team.
I won’t go through all the features and functions of Xobni in this post, but suffice to say I have instant access to all 92,000 emails. It is now trivially easy to find any message, conversation or file – literally in seconds. Many of us spend much, if not most, of our working days in Outlook. Xobni has had a huge positive impact on my productivity, eliminating hours and hours of time spent searching for those long, lost emails.
Thanks to all the folks I met at Xobni for making me welcome. Keep up the great work. Xobni Rules!!

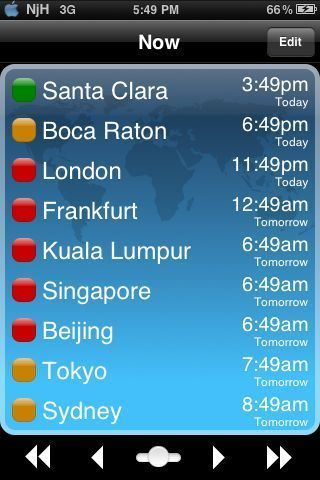
TimeScrolleris a niche app for those of us that attend conference calls across multiple timezones. It would also be useful if you need to call you granny in Australia or your friend in India and don’t want to wake them in the middle of the night.
Select as many cities as you wish and TimeScroller shows you whether it is a good time to call based on a red, yellow, green scale. You can select any local time and TimeScroller will show you the time in all the other locations.
Finally, TimeScroller can create an email with the times and locations listed. $1.99.

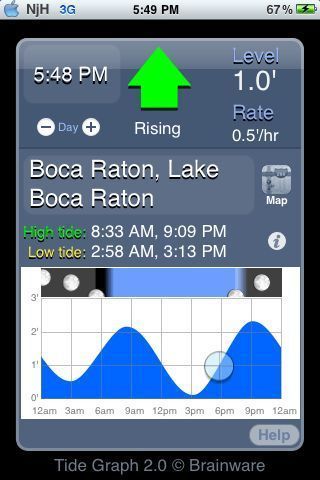
Tide Graph is a great app for those of us with boats in tidal waters. The single page UI is well laid out, let’s you select your location from an online database an shows tides on any date and time you want. The current version also remembers the most recent data for offline viewing. $1.99

 I’ve been struggling for the last 18 months trying to get


